I install UniFi door entry systems week in, week out, and it’s a platform I genuinely rate. It’s reliable, clean to manage, and once you’re invested in the ecosystem, it just makes sense to keep building on it.
So when it came to my own home, adding a UniFi Doorhub Mini garage door setup felt like a natural next step. I’m already fully embedded in Ubiquiti—networking, cameras, access—so if there’s a way to bring the garage door into that same system, I’m going to try it.
The good news is: it works, and it works well. But it’s not perfect—and there are a few quirks you’ll want to know about before you start.
In this guide, I’ll walk through exactly how I connected a Somfy garage door motor to UniFi Access using the Doorhub Mini, along with a camera, a physical button, and a contact sensor—plus the lessons learned along the way. Hopefully, it helps if you’re looking to do the same.
The Goal
I wanted to be able to open and close my garage door from the UniFi Access app, see a live camera feed linked to the door entry, have a physical button as a backup, and get an accurate open/closed status from a contact sensor. All within UniFi.

What You Need
The component list for a UniFi Doorhub Mini garage door setup is refreshingly straightforward:
- A Somfy garage door motor (or any motor with a dry contact trigger input)
- UniFi Doorhub Mini – linked here if you’re looking for one
- A UniFi-compatible camera – Link to a G5 Turret Ultra like mine here
- A wired physical door button – I’ve linked the one I used here if you need it
- A contact sensor – I’ve linked the one I used here if you’re trying to find it
- UniFi Access running on your network (which requires a UniFi console such as a Cloud Key or Dream Machine)
Before getting started, there’s one important caveat to keep in mind. The Doorhub Mini is a commercial access control device, designed for environments like offices, apartment buildings, and server rooms—not residential garages. That distinction matters in terms of both configuration and expectations, and it’s something I’ll revisit later in the guide.
There are other UniFi Access hubs available, such as the Gate Hub and the standard Door Hub, but for a simple garage door setup like this, the Doorhub Mini offers the best balance of functionality and value for money.
How A Garage Door Trigger Works
Before diving into the wiring, it helps to understand how garage door motors get triggered. Almost all of them use a dry contact input — the same principle as a push button. When you briefly short the two trigger terminals together, the motor acts: opening if closed, closing if open, stopping if moving. It cycles through those states with each trigger.

This is important because the Doorhub Mini has a relay output, and that relay is what we’re using as our “button press.” No complex protocols, no proprietary signals — just a brief electrical connection.
Important use the Dry setting on the DoorHub Mini not the 12V.

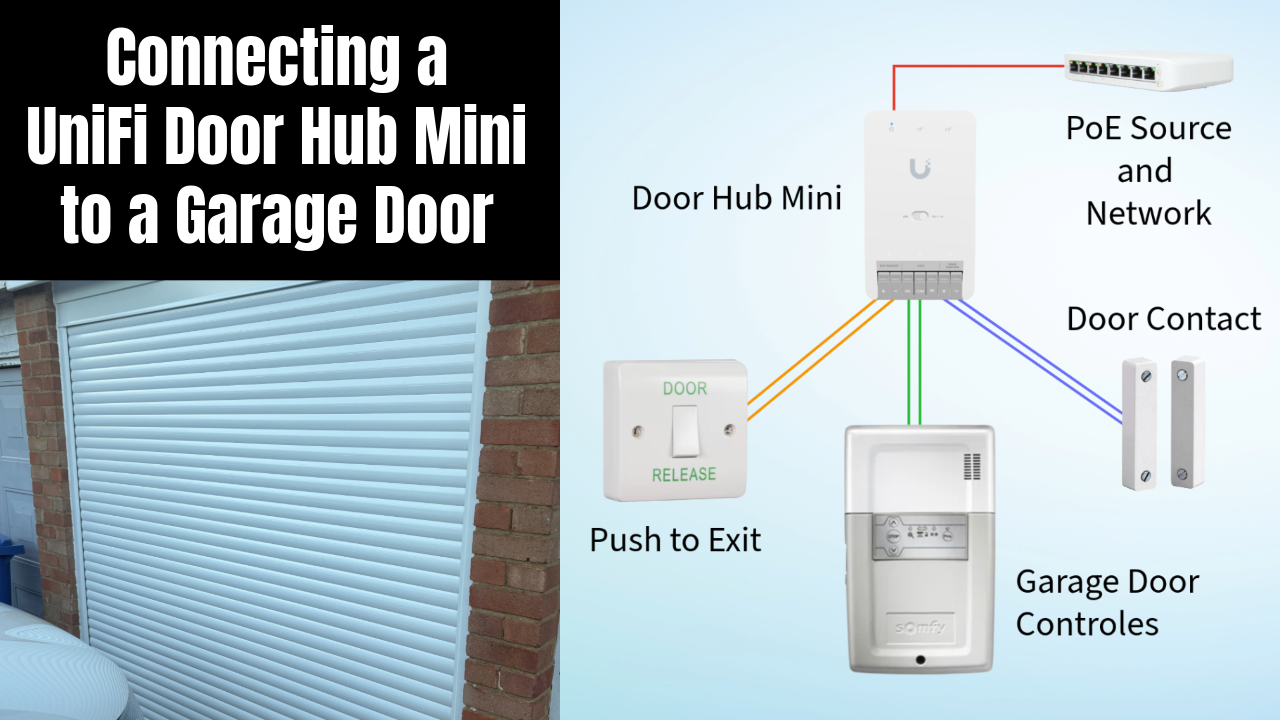
Wiring the UniFi Doorhub Mini to a Garage Door
The wiring process for a UniFi Doorhub Mini garage door setup is straightforward once you understand what each connection does.
Start by connecting the Door Hub Mini to your network using a PoE source. The unit supports PoE+, and in my setup I’m using a Ubiquiti Lite 8 Switch, which works perfectly since I’m not powering any additional devices from the hub. However, if you plan to add readers or other accessories, you’ll need either a PoE++ injector or a switch that supports PoE++.
Next, move to your garage door motor. On a Somfy system (or similar), locate the remote trigger or push-button input terminals—your motor’s manual will identify these clearly.
A quick and very useful trick here: you can test the correct terminals by briefly touching a short piece of wire across them. If the garage door activates, you’ve found the right connection points. This is exactly what the Doorhub Mini relay will replicate.
Once identified, run a pair of wires from these terminals back to the relay output on the Doorhub Mini. This connection allows the hub to simulate a button press to open or close the door.

Before you make everything neat, terminate cables properly, or seal up any enclosures, it’s well worth testing the setup. Trigger the relay from UniFi Access and confirm the door opens and closes as expected. It’s much easier to fix wiring issues at this stage than after everything is tidied away.
For manual control, wire your push button into the Doorhub’s NO (Normally Open) and COM (Common) terminals. Polarity doesn’t matter here, as the hub simply completes the circuit in the same way a physical button would.
The contact sensor should be mounted across the garage door and frame so it can detect when the door is fully open (or closed, depending on your preference). Wire this back to the Door Position (+ and -) terminals on the Doorhub. Again, polarity is not important for this connection.

If you’re adding a push-to-exit button, wire one conductor to L1 and the other to COM on the button itself. Then connect this back to the Exit Request (+ and -) terminals on the Doorhub Mini. As with the other low-voltage inputs, polarity isn’t important.

Camera placement is flexible and depends on your priorities. In my case, I positioned the camera to capture a full view of the garage rather than focusing solely on the door. While this isn’t a perfect angle for the door itself, it provides better overall visibility and allows me to review footage for each opening event.

For cabling, I used a mix of Cat6 and Ubiquiti Door Cable. When using Cat6, I doubled up conductors and added ferrules to make termination easier and more secure. You could also use bell wire or alarm cable, as there’s no significant power running through these connections, so cable gauge isn’t critical. My cable runs are short and easy to track, but if your setup is more complex, labelling each wire is definitely recommended.

If you’re new to UniFi cameras, I’ve covered more on UniFi Protect and how it behaves in real-world setups here…
Configuring the UniFi Doorhub Mini for a Garage Door
Once your UniFi Doorhub Mini garage door setup is physically wired and the device is adopted into your network, head into UniFi Access to configure it as a door.
For the relay settings, you only need a very short trigger duration. A pulse of 0.1 seconds is ideal—in fact, anything longer can cause issues. Garage door motors expect a momentary trigger, similar to a quick button press. If you use maintained mode, the relay stays closed continuously, which can confuse the motor and prevent it from operating correctly. I’ve set mine to 0.1 seconds, which works reliably with my Somfy motor, but you can tweak this slightly if your setup requires it.

When configuring the door position sensor, placement matters more than you might expect. I initially mistakenly mounted my contact sensor at the top of the door, which led to some inaccurate status reporting. To compensate, I set the door position to “Open Active”, meaning the system shows the door as open when the contact is closed. This works when the door is fully open, but it introduces a flaw—if the door is partially open, UniFi Access still reports it as closed.
The better approach is to mount the sensor at the bottom of the door and configure it as “Closed Active.” This way, the system will correctly register the door as open as soon as it moves, even slightly. I plan to update mine when I get the chance, as this provides much more accurate real-world status.
The push-to-exit button requires no additional configuration—it works immediately once wired correctly.
That just leaves the camera. If your camera is already adopted in UniFi Protect, pairing it with the Doorhub Mini is quick and easy. It’s worth noting that the camera does not need to be physically connected to the Doorhub Mini to be linked in software (although it can be if you prefer). Once paired, you’ll automatically get a video recording for every door event, which is a great addition for both convenience and security.
If you’re working with UniFi Access in other scenarios like gates or licence plate recognition, I’ve covered common real-world issues here…
UNIFI LICENCE PLATE UNLOCK NOT WORKING – COMMON CAUSES & FIXES
THe Result
In practice, it works well. Tap the door in the Access app and the relay fires. The camera feed is right there alongside the door controls. The contact sensor updates the status accurately. The physical button is a reliable backup. Everything logs in Access, so you have a record of every open and close.
For anyone already in the UniFi ecosystem, having the garage in the same place as your cameras, network, and other access points is genuinely useful. No extra app, no separate login, no third-party integration to maintain.
Limitations of Using a UniFi Doorhub Mini for a Garage Door
This is where it’s important to be honest—the UniFi Doorhub Mini garage door setup works well, but it’s not a perfect solution.
The most obvious limitation is the single-button behaviour. Garage door motors typically use one trigger for open, pause, and close, and that’s exactly how this setup works. However, UniFi Access is designed for traditional doors with strikes or latches, so the interface doesn’t reflect this properly. In the app, you’ll only see an “Open” button, with no awareness of the door’s current state. In reality, that button is acting as a toggle—open, pause, or close—depending on what the door is currently doing.
The contact sensor behaviour is another quirk. Instead of simply showing the door as “open,” UniFi Access often reports it as an “unauthorised opening.” This happens because, from the system’s perspective, any door state change that wasn’t triggered by an official Access command is unexpected. It’s not a dealbreaker, but it does feel slightly off—and unfortunately, there’s no setting to change this behaviour.
The camera integration is also a bit inconsistent. Event recordings are great—you get a full, normal view of the garage whenever the door is triggered. However, when you view the door directly in the UniFi Access app, the camera feed is forced into a portrait-style crop. Since my camera is positioned to capture the whole garage rather than just the door, this results in an awkward, zoomed-in view of part of the scene. Again, it’s a minor irritation, but one that would benefit from more flexibility.

Ultimately, the limitation comes down to the fact that the Doorhub Mini is built for commercial access control, not residential garage automation. As a result, configuration options are quite limited. If you’re expecting fine-grained control or garage-specific features, you won’t find them here—the system does what it’s designed to do, and not much more.
Need a solid internet failover? I’ve reviewed the UniFi 5G Max here.
Is a UniFi Doorhub Mini Garage Door Setup Worth It?
If you’re already running UniFi Access and want your garage in the same ecosystem, then yes—a UniFi Doorhub Mini garage door setup makes a lot of sense. The limitations are real, but they’re manageable. The setup is stable, the integration is clean, and it removes the need for yet another app.
If you’re not already invested in UniFi, though, this probably isn’t the best place to start. You’d effectively be buying into a commercial access control platform to solve what is, at its core, a consumer problem—and that’s a significant investment just for a garage door.

The honest takeaway is this: UniFi Access wasn’t designed for this use case. You can adapt it to work with a garage door motor, and the end result is solid—but it lacks the polish and flexibility of a purpose-built smart garage solution. If you’re happy to accept a few rough edges, it’s a genuinely useful integration.
And if you’ve built something similar—or found clever ways around any of these limitations—I’d be interested to hear how you’ve approached it.

FAQ: UniFi Doorhub Mini Garage Door Setup
Can the UniFi Doorhub Mini control a garage door?
Yes—the UniFi Doorhub Mini garage door setup works by using the relay output to simulate a button press on the motor. As long as your garage motor supports a dry contact trigger input, it will work.
What relay settings should I use?
Set the relay to momentary (pulse) mode, not maintained. A pulse duration of around 0.1 seconds is ideal for most garage door motors.
Why does UniFi Access show “unauthorised opening”?
This happens because UniFi Access expects doors to open only when triggered by the system. If the door state changes outside of that (or doesn’t align perfectly), it flags it as unauthorised. Unfortunately, this behaviour can’t currently be changed.
Does polarity matter for the wiring?
No—for the relay, push button, and contact sensor connections, polarity does not matter. These are simple dry contact inputs.
Do I need a UniFi camera connected directly to the Doorhub Mini?
No—the camera just needs to be adopted in UniFi Protect. It can then be linked in software to the door for event recordings.
Is the Doorhub Mini the best UniFi device for a garage door?
Not necessarily. The Gate Hub is more suited to this kind of use case. However, the Doorhub Mini works well if you already have one or want a lower-cost option.
Can I see if my garage door is partially open?
Not reliably with a single contact sensor. Depending on placement, UniFi Access may show the door as closed even if it’s partially open. Mounting the sensor at the bottom of the door helps improve accuracy.
Is this better than a dedicated smart garage controller?
If you’re already using UniFi Access, yes—it keeps everything in one system. If not, a dedicated smart garage solution will usually offer more features and better polish.
Will UniFi Access record garage door openings from remote fobs?
No—if you’re using standard garage door fobs, the UniFi Doorhub Mini garage door setup won’t record those events. The motor is being triggered directly, so UniFi has no visibility of it. It is possible to integrate fobs through the Doorhub Mini itself, but it’s a more involved setup. I’ve covered that separately in a short video.
Does UniFi record openings from a physical button?
Yes—if the button is wired into the Doorhub Mini, UniFi Access will log the event. However, it won’t be linked to a specific user, so it will simply show as a door trigger rather than identifying who pressed it.
Author: Huw Jones – Home Network Solutions Berkshire
Huw is a UniFi specialist and the owner of Home Network Solutions Berkshire, providing professional networking, CCTV, gate automation and smart home installations across the UK. With years of hands-on experience and a growing YouTube audience at @home.network.solutions, Huw creates practical, no-nonsense guides to help homeowners and installers get the best out of their UniFi systems.
Leave a Reply